Art has the unique ability to transform an otherwise unremarkable space into an oasis of personal taste. Properly illuminating your artwork is crucial to showcasing its full potential. The right lighting can not only enhance the visual appeal of your artwork but can also highlight details that may be otherwise lost in a dark space. This allows your artwork to be a key focal point of your interior design. In this comprehensive guide, we will learn how to light up your artwork at home, while offering insights and tips to help you make the most of your cherished pieces.
The Basics of Artwork Lighting
Before we get into the specifics of how to light up your artwork, it's essential to understand the fundamental relationship between artwork and light. Different types of artworks demand tailored lighting solutions to bring out their unique qualities. Whether it's a painting, photograph, or sculpture, lighting can significantly impact how you perceive and appreciate the artwork. Sculptures require further consideration beyond that of two-dimensional artwork due to the multi-plane illumination required, as well as the projected shadows from the sculpture. We’ll cover the nuances of sculpture illumination further in a separate article.
The primary purpose of art lighting is to create a balanced and harmonious visual experience. The interplay of light and shadow adds depth and dimension to the artwork, making it more captivating to the viewer. Artwork benefits from illumination that is approximately 25% brighter than existing ambient lighting to provide just the right emphasis. It is important that your artwork is highlighted yet not overstated in your space. Using a dimmable fixture will allow you to balance this presentation, in addition to determining the proper size fixture for your artwork.
Proper lighting also prevents colors from appearing washed out or distorted, ensuring that the artwork is displayed as the artist intended. When learning how to light up your artwork, selecting the ideal fixture style and color temperature for your artwork is almost as important as the artwork itself. The right choice can significantly enhance the way art is presented and appreciated. A well-chosen fixture will enhance the overall aesthetic of your artwork and decor. Moreover, paying attention to color temperature is essential to accurately represent the colors in the artwork. In the realm of art lighting, achieving the perfect balance between style and light quality can transform your art collection into a mesmerizing focal point in your home.

Wall or Frame Mounted Picture Lights vs. Ceiling Mounted Lights: What’s the Difference?
Lighting for artwork comes in a variety of shapes, sizes, and colors, but a key consideration will be how your fixture is mounted. Each possible option will come with its own set of pros and cons for installation and use.
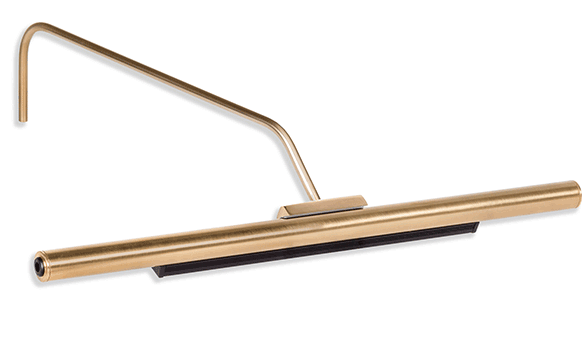
Picture Lights
Picture lights are defined by their placement immediately above the artwork, mounted to the frame or the wall. These options are a classic choice for illuminating artwork with a clean presentation.
- Wall Mounted Picture Lights
Wall mounted picture lights are installed directly on the wall above or behind the artwork, providing a professional look that enhances the aesthetics of your space. One key advantage of wall mounted lights is that they avoid the need to attach anything to the artwork itself. A major detractor is that many fixtures on the market utilize a bulky base that require mounting to an electrical junction box through which the light is powered. This is referred to as ‘direct wire’ installation, [which you can learn more about here (add this section and link once appropriate article is published)]. There are, however, also wall mounted picture lights available that can be mounted behind your artwork for a more discreet and unobtrusive installation.
- Frame Mounted Picture Lights
Frame mounted picture lights mount directly to the back of your frame or artwork and are another option for illuminating your cherished pieces. This provides similar coverage and presentation to a wall mounted fixture due to the proximity to your artwork. While these fixtures typically only require a few wood screws to attach to your frame, further consideration may be required if your artwork is unframed or displayed in a particularly thin frame.
Our picture lights use slim mounting brackets that can mount your fixture to the back of your frame or the wall behind your artwork, allowing you to determine what works best for your needs. Wiring can be concealed using a number of methods to retain the sleek presentation most are after.
Pros of Picture Lights:
- Clean presentation.
- Illuminate the entire artwork evenly.
- Fixed variables allow for reasonable expectation of coverage provided.
- Relatively simple installation process.
Cons of Picture Lights:
- Direct-wire fixtures are bulky and use large, exposed base for mounting.
- Fixtures that mount behind artwork require clearance for the mounting system.
- Further consideration may be needed to manage glare.

Ceiling-Mounted Lights
Ceiling-mounted lights offer a more versatile option for lighting artwork, though are more expensive and require a much more involved installation process. Track lighting and recessed fixtures (often referred to as ‘ceiling cans’ or ‘canned lights’) fall into this category. These fixtures can be adjusted to shine light onto various artworks in a space, making them an excellent choice for those with ever-changing art displays. Unfortunately, the cost and complexity of installation for these systems is often prohibitive.
Pros of Ceiling-Mounted Lights:
- Ideal for gallery walls with multiple artworks.
- Ability to change the lighting angle.
- Ability to reduce vertical glare from fixture if installation, setting, and power allow.
- Fully customized projector systems can help eliminate shadows from frames and light spill.
Cons of Ceiling-Mounted Lights:
- Industrial, less refined appearance.
- Installation process is more intrusive and complex.
- Will require additional equipment and wiring.
- Compatibility between components often requires thorough confirmation or consultation from a lighting designer.
- High cost associated relative to picture light counterparts.

The Role of Light Quality in Art Illumination
The quality of light from a fixture can significantly affect how you perceive your artwork. Two critical factors to consider when choosing lighting for your artwork are Color Rendering Index (CRI) and Color Temperature.
Color Rendering Index (CRI): CRI quantifies how accurately a light source replicates colors compared to a natural light source, most often sunlight. If a light offers low CRI (below 90), colors will appear dull, unsaturated, and unnatural – particularly those with any ‘strong red’ components. A higher CRI value (above 90) ensures that your artwork appears true to life and artist intention. Art lighting will ideally be 93+ as this will produce significantly improved color rendering accuracy.

Color Temperature: Color temperature, defined in Kelvin (K), determines the warmth or coolness of the light. For displaying artwork, a color temperature between 2700K and 4000K is preferred, with 3000K being considered ideal and widely adopted by museums and galleries. Warmer lighting (2700K) can enhance the cozy, inviting feel of traditional artwork, while slightly cooler lighting (around 3000K) provides balanced, neutral illumination for a wide range of art pieces and home décor. Cool, crisp lighting (4000K) tends to be preferred by photographers and those with more modern interior design. Sticking with a consistent color temperature throughout a space will provide the most cohesive presentation. Nearly all of our fixtures are offered in both 2700K and 3000K to meet your needs. The addition of our color tuning 2700K-4000K Plug-in Vision Series completes the cooler end of the spectrum, as well as allowing you to determine which of these temperatures may be suitable for your space – all with the push of a button.

Selecting optimal CRI and coordinating color temperature with ambient conditions is crucial for the proper enjoyment of not only the artwork, but also the room itself. All of our art lighting fixtures offer high 93-95+ CRI across our offered color temperatures to provide the most accurate color experience.
Selecting the Right Size and Placement of Picture Lights for Your Artwork
The size of your picture lights should be carefully chosen to complement your artwork without overwhelming it, while still providing optimal coverage for the piece. A consistent rule to abide by is that you do not want the art light to be wider than the artwork itself. It was traditionally recommended that an art light should be roughly 2/3 the width of the artwork, though this has been negated by the use of optical systems that allow for better collection and re-distribution of light in various shapes and sizes. While few companies are utilizing them, these improved systems radically change the efficiency, size, and shape of light output by a given fixture and the legacy ‘2/3 width’ recommendation no longer applies. This is apparent in our Rechargeable Micro Series and Plug-in Micro Series art lights, which are the smallest art lights in the world.

Determining the best size light for artwork requires further consideration of how the artwork is displayed. Artwork that is unframed or displayed in a thinner frame may require a wider or larger picture light to ensure full coverage throughout the top of the artwork in accordance with the Inverse Square Law. Our team is always happy to discuss specifics of your artwork and display to make recommendations for fixture sizing.
Once the proper fixture size has been determined, positioning the light source to begin illumination at the top of the artwork is recommended to provide even coverage throughout the piece. When illuminating with a ceiling-mounted light, it is often recommended to shine at a 30-degree angle to reduce possible glare from the fixture. This angle is not ideal when using wall or frame mounted picture lights as managing this angle (while still retaining proper coverage) requires the unsightly placement of the light fixture high above your artwork. As an example, a fixture that extends 10.5” from the mounting surface requires a fixture height of 8” above your artwork if attempting to achieve this 30-degree angle. Not only does this not bode well aesthetically, but also results in wasted light on the wall above your artwork. The light spread above the picture then reduces the isolation of the artwork from its surroundings and thereby negates the impact of the 25% brighter light mentioned previously. In this case, experimenting with different angles and placement of your light fixture and artwork will help find the ideal fit for your artwork.

Art Lighting Mistakes to Avoid
To achieve the best lighting for your artwork, it's essential to avoid common mistakes:
Overly Bright or Dim Lighting: Excessive illumination can cause artwork to look more like a billboard than a prized possession, while dim illumination may not properly display the fine details of your piece. Use dimmer switches or brightness adjustable fixtures to control the intensity of the light and ensure a balanced presentation. This will change throughout the day as the intensity of the ambient light varies.
Improper Placement: Determining the proper picture light placement is essential for receiving the best coverage possible. Placing lights too close to the artwork can result in uneven illumination and hotspots. On the other hand, mounting an art light too high or far away from a picture can lead to wasted light and excess light spread, detracting from your presentation. Experiment with different angles and positions to find the best placement.
Improper Sizing: Selecting a fixture that is too small for your artwork can provide imbalanced illumination or vignetting in the upper corners. Conversely, an art light that is too large will draw the eye away from your artwork or illuminate far more than is desired. Choosing a picture light that offers both the desired coverage and a proportional display is ideal. Discuss your selection with an art lighting specialist if you are unsure of the proper size or fixture.
Inconsistent or Poorly Selected Color Temperatures: Using conflicting warmer and cooler color temperature lights in a space or on similar pieces of artwork will lead to a noticeable difference between tone of light. Additionally, lighting that is too warm or too cool can distort the way a viewer experiences the colors in a painting or photograph. While using a more neutral tone will provide a true-to-tone experience of your artwork, take care to check the color temperature of your ambient lighting and other art lighting fixtures in the room for the most consistent presentation of light.
FAQ Section
How do I reduce glare on my artwork?
To reduce glare, position lights at an angle and consider using matte finishes on frames and artwork. Adjusting the height of the fixture relative to the artwork will also allow you to minimize potential glare from the fixture. Explore further details on how to minimize glare from a light fixture here: Click here
Is LED lighting safe for all types of artworks?
LED lighting is considered safe for most types of artworks as it emits low heat and UV radiation. However, consult with an art lighting specialist for specific recommendations if you have concerns about a particular piece or medium.
Conclusion
In conclusion, learning how to light up your artwork at home requires careful consideration of various factors, from the type of lighting fixture to color temperature and placement. By following these guidelines and avoiding common mistakes, you can create a captivating display that does justice to your cherished artworks and home décor for years to come.