Paintings, photographs, and other artwork offer the unique ability to transform a blank wall, infusing it with personality, emotion, and visual interest. That said, the impact of artwork is significantly influenced by how it is displayed within a room. Understanding how to hang artwork properly can elevate the aesthetic appeal, enhance perceived value, and assist in creating a cohesive environment. In this comprehensive guide, we will explore the various aspects of displaying artwork, covering everything from assessing your space to choosing the right tools, hanging techniques, display styles, lighting considerations, maintenance, and common mistakes to avoid.
Preparing Your Art for Display
Assessing Your Space
Before hanging artwork, it's essential to accurately assess the space where it is to be displayed. Take the following factors into consideration:
-
Wall Texture and Color: Taking note of the texture and color of the wall where your artwork is to be displayed will give insight as to how the piece will be perceived. A smooth, neutral colored wall will provide a clean background to allow artwork to take focus. Conversely, a textured or brightly patterned wall may require careful consideration of how bright artwork may clash but could lend a modern feel when displaying abstract artwork with muted tones. The color and texture of your walls may also have an impact on your ease in hiding the cords from your plug-in art lights.
-
Ambient Lighting: Evaluate the amount of existing natural and artificial light in the room. Consider how different lighting conditions will affect the artwork's visibility and appearance throughout the day, as well as the longevity of your artwork. Displaying artwork in frequent, direct sunlight can be detrimental to delicate mediums. Aim to select a wall space that receives gentle, ambient light from evenly spaced lamps in lieu of direct sunlight.
-
Furniture Arrangement: Consider the placement of furniture and other décor in the room. Ensure that the artwork complements the existing balance and color palette. Ideally, your artwork will serve as a focal point without feeling crowded or overshadowed by other pieces.

Once you've properly assessed these factors, the next step is to measure the space where you intend to display your artwork. Visualize how the art will fit within the context of your décor and overall design theme.
Choosing the Right Tools
Being prepared with the appropriate tools for displaying your artwork is crucial to a secure and easy installation. The following is a brief, though not comprehensive, list of some essential items you may need:
-
Levels: Using a level will ensure that your artwork is perfectly straight and aligned. Many rulers are available with levels built into them, and most smartphones offer a level feature built in. Laser levels are also available to allow for precision when hanging numerous pieces.
-
Stud Finder: A stud finder helps to locate wall studs, providing secure anchor points for delicate or heavy pieces of art. There are both electric and magnetic options on the market.
-
Hooks, Wires, and Fasteners: Choose hooks, wires, fasteners, and other hanging systems suited to the weight of your artwork and wall type. For example, using J-hooks allows for easy hanging of artwork hung on a wire or ring system. Sawtooth hangers may also be suitable for smaller artworks, though keep in mind that a hanging system that is centered at the top of your frame may interfere with a picture light when the time comes to illuminate your precious artwork. Consider heavy-duty hangers like French cleats for heavier pieces.
-
Drills, Screwdrivers, and Other Tools: Using a drill to create a pilot hole will allow for easier picture hanging when using screws. You may conversely want to come prepared with a hammer in the case of using picture nails.
-
Protective Gear and Materials: Wear gloves and protective eyewear as needed. Use protective materials such as felt pads to prevent wall damage during installation. Moving blankets will also assist with protecting your artwork during any maneuvering.

Hanging Techniques by Art Type
Light Artwork (Under 10 lbs)
For lightweight artwork, such as small frames or canvases, adhesive strips or small nails can provide a secure and low-damage hanging solution. There are many picture hangers on the market using adhesive backing for displaying small artwork hung on a wire or ring system. Follow these steps when hanging small artwork:
- If using adhesive strips of any kind, clean the surface of the wall with isopropyl alcohol and allow to dry completely to ensure proper adhesion. Textured surfaces should be avoided for use with adhesive strips. We recommend testing a sample strip on another surface prior to adhesion to your artwork.
- Position the center of the artwork near eye level and use a level to ensure it's straight. Mark the desired position. A general guide is to have the center of the artwork approximately 60” to 68” from the floor.
- Apply adhesive strips or hammer small nails into the wall, taking care to space evenly. If using adhesive strips, carefully consider the instructions included. Many have a required curing time to ensure proper adhesion. If using nails, hammer them gently to avoid damaging the wall.
- Hang your artwork, using a level to ensure it is straight and aligned.

Medium Artwork (10-25 lbs)
For medium-weight artwork, such as framed pictures or moderate-sized paintings, wall anchors and hooks or screws provide sturdy support to ensure secure installation. Follow these steps when displaying your medium-weight pieces:
- Use a stud finder to locate wall studs for added stability.
- Install wall anchors at the desired hanging points, following the manufacturer's instructions. Many are available to be compatible with both drywall and stud installations. Drilling a pilot hole may aid in ease of installation.
- Attach hooks or screws to the anchors and hang the artwork, using a level to ensure it is straight and properly aligned.

Heavy Artwork (Over 25 lbs)
For heavy artwork, such as large, framed paintings and metal artwork, secure hanging methods are essential. Follow these steps when hanging heavy artwork:
- Locate wall studs using a stud finder and mark the location on the wall.
- Drill pilot holes into the studs at the desired hanging locations.
- Install heavy-duty hangers or bolts into the pilot holes, ensuring they are securely anchored.
- Hang the artwork, using a level to ensure it is straight and aligned.

For exceptionally heavy or valuable pieces, consider seeking professional assistance with installation to ensure you have the appropriate support necessary.
Display Styles Explained
Single Art Pieces
A singular piece of artwork can make a powerful statement when displayed correctly. Consider the following tips to let your single art piece shine:
-
Placement Height: Hang the artwork at eye level for an optimal viewing angle. “Eye level” is considered between 60” to 68” from the floor, as a general rule. Displaying your artwork around eye level will also aid in minimizing the potential for glare from a picture lighting fixture. There isn’t necessarily a “perfect height”, so adjust according to your needs.
-
Centering Techniques: Center the artwork horizontally within the space it occupies to achieve an even visual balance.
-
Visual Weight: Consider the visual weight of the artwork and its impact on the room's overall symmetry. A dark, heavy frame will seem out of place in a coastal décor scheme. Conversely, a light, airy piece of artwork will not mesh well in a dark, moody room, and may not ‘pop’ the way one intends.
-
Proper Lighting: Use an appropriately sized picture light to illuminate your artwork. The right light will provide a more isolated presentation, creating a focal point in your space.

Gallery Walls
Gallery walls offer a dynamic way to display multiple pieces of art in a cohesive presentation. Follow these steps to create a stunning gallery wall:
-
Planning: Choose a theme or color scheme for your gallery wall and select complementary artwork, also considering the existing décor theme.
-
Layout: Experiment with different layouts, such as an even grid or a salon-style arrangement, to find the most visually appealing configuration.
-
Spacing and Alignment: Maintain consistent spacing between each piece and ensure they are aligned both horizontally and vertically.
-
Choosing Mediums and Frames: Use frames with similar tones and weights to achieve a polished, clean aesthetic. You can instead combine different mediums and frame styles for a more eclectic feel.

Layered and Leaned Artwork
There are times that hanging a picture on the wall is not ideal, whether due to delicate wall mediums or ever-changing displays. In cases like this, you can choose to lean your artwork against a nearby wall or another décor piece. You may also find that you prefer a more casual display of layering frames, allowing you to display multiple pieces cohesively. Follow these tips when considering leaning and layering your artwork:
-
Layout: Layer smaller pictures in front of larger pieces for visual interest in varied textures. Using more muted pieces in the backdrop allows for more detailed pieces in the foreground to ‘pop’.
-
Choosing Frame Styles: Complementary frame styles will provide a more cohesive, polished presentation. Consider mixing mediums and frames to add complexity to the display.
-
Protection and Support: Using felt pads behind frames will protect your walls from scuffs and scrapes. You can also use small pads or sturdy décor pieces in front of leaned artwork to prevent sliding.

Choosing and Installing Compatible Art Light Mounting Systems
Types of Art Lighting
Once your artwork is on display, the next step is to properly illuminate it. There are several art lighting styles available, but three major categories that most fall under:
-
Picture lights: Picture lights refer to a light that is mounted on or behind the artwork itself. This encompasses our entire offered range of art lighting.

-
Ceiling-mounted lights: As is suggested by the name, these are lights that are mounted on or in the ceiling. While these provide a beautiful display, the cost and involvement involved for installation are often prohibitive.

-
Track lights: Track lights can technically fall under either picture or ceiling-mounted lights, depending on the system in question. These use either a mechanical or electrified track that individual lights can freely slide upon for adjustment.

Installation with Situ Fixtures
The picture lights offered by Situ Lighting are compatible with most hanging styles available. Certain hanging systems may require modification by our technicians or other considerations to allow for easy installation. The following are the art light mounting styles available with our fixtures:
-
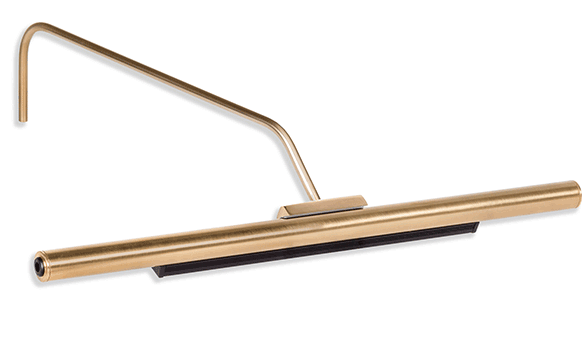
Standard Mounting: Our standard mounting system is included with most of our fixtures, save for the Plug-in ArtTrack and the Rechargeable Micro Series. With this mounting system, a 2” wide bracket is included for each arm of the fixture – either one or two, depending on the model selected. The set screw within this bracket is then tightened to secure your light at the desired height over the artwork. Any artwork hung on a wire or ring system will have more than enough space to accommodate this by way of the inherent flexibility. We recommend mounting the brackets about 1” below the top of the frame to allow for discreet mounting while also allowing you to take full advantage of the vertical height adjustment available with the fixture. This can be mounted to either the back of the artwork, or the wall directly behind it.
-
Flush Mounting: The Plug-in ArtTrack is our fixture that was designed specifically with flush mounted artwork in mind. This often refers to artwork hung using a French cleat. With this mounting system, an ultra-slim (less than 1/10”) mounting bracket or track system is attached to either the back of your piece or the wall behind the artwork using the included screws. Any of the fixtures that come with the standard mounting system can be modified to instead use this flush mount system, however, using this mounting system eliminates all vertical height adjustments normally inherent to the fixture. This may lead to you needing to choose a larger size picture light for your artwork than you may otherwise need.
-
Unique No-Mounting-Required: The Rechargeable Micro Series is our wireless art light designed for small artwork. This fixture is unique in that no actual “mounting” is required. The black portion of the fixture that houses the battery unit slides discreetly behind your artwork. The head of the light then extends beyond your artwork to shine back, allowing gravity and balance to take care of the rest. The Rechargeable Micro Series does require about ¾” behind the artwork to accommodate this battery pack and will not work well with artwork hung using a French cleat or sawtooth hanger.
-
Direct Connect: Direct connect or direct wire fixtures utilize a cover plate or box affixed to the wall directly above your artwork. The wiring from the light comes directly out of this box and is connected to an electrical junction box housed within the wall. This mounting system is convenient in that it requires no modification to your artwork or frame, however, the large box necessary for mounting may detract from the isolation of the artwork itself. While we don’t currently have a fixture that offers this mounting system, we are hard at work in developing a light fixture for installations that require direct connect mounting.
Lighting Considerations
Illuminating your artwork consists of more than just mounting a light. You’ll want to consider some of the important factors of art illumination and home décor. The following are a few of the variables to consider:
-
Color Temperature: Choosing a color temperature in art lighting that both complements your artwork and is cohesive with ambient lighting is paramount to fully enjoying the display. While you always want to consider the existing lighting scheme to ensure a cohesive presentation, choosing a more neutral color temperature like 3000K will provide for an accurate color display. Color tuning options like the Plug-in Vision Series will allow you to choose between numerous color temperatures in one fixture to allow you to tailor your presentation in hand.
-
Adjusting for Glare: Glare, while a nuisance, is simply a reflection of light. Adjusting for glare is largely a matter of adjusting the placement of the fixture relative to the viewing angle. Raising the art light as high as possible will be your greatest tool. Beyond that, you may also consider lowering the artwork itself or using the art light from below the piece as uplighting.
-
Dimmers: A dimmable fixture allows for tailoring the brightness of the light output for your needs. Balancing an art light against ambient lighting is necessary to achieve the desired isolation without overpowering a space. It is recommended to change the brightness of your art light throughout the day based on the varying levels of natural ambient light.
Maintenance and Care
Regular Maintenance
Caring for your displayed artwork will help maintain the beauty and value of the piece over time. The following are a few quick tips to keep up with your beautiful new installation:
-
Regular Cleaning: Use a dry, non-abrasive cloth or brush to regularly dust the surface of the artwork as well as the frame and art light, if present. Most cleaning liquids should be avoided for frames, art lights, and other delicate artwork mediums.
-
Inspect Hanging Hardware: Periodically check the hanging hardware to ensure it is still in good condition. Loose or damaged hardware can lead to your precious artwork falling and getting damaged.
-
Re-framing: Consider re-framing your artwork should you notice that the current frame is damaged, deteriorating, or no longer matches your décor over time. Yellowing and chipping are two major signs that a replacement frame may be in order.
Adjusting and Updating Displays
Refreshing your art display can keep décor from feeling stale. Rearranging the current layout can highlight pieces that may have otherwise been less noticeable. You can also swap your frames for a different style or color to change the aesthetic. Consider layering artwork within frames for a scrapbook style effect, allowing you to display new pieces without having to make further holes in your wall.
Common Mistakes to Avoid When Hanging a Painting
Hanging a picture on a wall can be an easy process, however, there are certain frequently made mistakes that can be avoided if you’re aware. Keep vigilant against these common problems:
-
Improper Spacing and Alignment: Keeping an equal distance between different pieces of artwork as well as other décor will ensure a visually balanced display. Avoid overly tight or wide gaps that may disrupt the flow of the eye.
-
Improper Hardware: Choose the right hardware for your artwork hanging style and weight, as well as your wall type, to make sure the piece is securely affixed.
-
Improper Lighting: Harsh sunlight can damage artwork and frames over time. Incandescent and halogen bulbs can also be too warm or can impart UV damage. Hanging artwork in a safe location and using an LED light for illumination will allow your artwork to be seen without concern for damage.
Conclusion
Whether you're learning how to hang artwork as a single piece for a focal point or creating a dynamic gallery wall, attention to detail is key. Take the time to measure, align, and light your artwork properly with the appropriate tools, paying close attention to factors like spacing, lighting, and visual balance. Regularly inspect your frame for wear, clean as needed, and update your displays to keep things fresh and inspiring.
By avoiding common mistakes and embracing best practices, you can elevate the visual appeal of your space and create an environment that truly feels like home. The satisfaction and visual impact that come with successfully hanging artwork are well worth the effort, and the final result will be a space that not only looks beautiful but also feels uniquely yours. Happy displaying!